
Introduction:
Simple Rose Drawing: Drawing is a creative and fulfilling hobby that allows us to express ourselves visually. Among the many subjects to draw, flowers are a popular choice, and a simple rose drawing is a classic favorite. In this article, we’re going to embark on a delightful journey of a simple rose drawing. No matter if you’re a budding artist embarking on an exciting journey of artistic expression or a seasoned creative soul striving to enhance your skills and reach new levels of mastery, this guide is here to be your steadfast companion, providing unwavering support at every step. Whether you’re taking those initial steps to unlock your creative potential or yearning for artistic growth, let this comprehensive guide be your go-to resource, offering valuable insights and guidance. With its help, you can navigate the vast landscape of artistic expression with confidence and embark on a fulfilling journey of self-discovery and skill development. From the earliest stages of learning to the pinnacle of expertise, we’ve got you covered with a treasure trove of knowledge and guidance. So, rest easy knowing that you have a wealth of resources at your disposal to nurture your artistic growth and inspire your creative endeavors. So, get ready to embark on a transformative journey of artistic discovery, and let this guide be your trusted companion, nurturing your creative spirit and fueling your passion for the art of rose drawing. Prepare yourself for an abundance of invaluable tips, techniques, and tricks that will act as your guiding light in crafting a breathtaking rose drawing that will leave you utterly mesmerized. No matter where you are on your artistic journey, get ready to be empowered and inspired as we embark on this artistic quest together. Brace yourself for a treasure trove of knowledge that will unleash your inner artist and allow your rose drawing to bloom in all its glory.

Definition: What is a simple rose drawing?
Before we jump into the exciting realm of drawing a simple rose and let our creative juices flow, let’s pause for a moment to establish a shared understanding of what exactly we mean when we talk about a simple rose drawing. It’s crucial to have a clear vision and comprehension of this concept before we embark on this captivating artistic adventure side by side. So, let’s lay the foundation of our journey by defining the essence of a simple rose drawing, ensuring that we’re all on the same page as we venture forth into the realm of creativity. A simple rose drawing refers to a stylized representation of a rose with minimal intricacies. It captures the essence of a rose’s beauty while maintaining simplicity in its form and details.
Importance of learning a simple rose drawing:
Learning to draw a simple rose can be beneficial in several ways. Firstly, it enhances your artistic abilities and understanding of form, shape, and composition. Additionally, it allows you to create personalized artwork, gifts, or decorations featuring roses. Lastly, drawing a simple rose can be a relaxing and therapeutic activity, providing you with a sense of accomplishment and joy.
Necessary tools and materials:
- Drawing paper: Choose a high-quality paper suitable for your preferred drawing medium.
- Pencils: Select a range of graphite pencils (HB, 2B, 4B, etc.) for sketching and shading.
- Erasers: Have a kneaded eraser and a precision eraser for corrections.
- Pencil sharpener: Make your pencils sharp for precise lines.
- Reference materials: Collect images or real roses for visual reference.
Anatomy of a Simple Rose Drawing:
Understanding the basic shape and structure of a rose is crucial for accurately capturing its beauty in your drawing. Familiarize yourself with the following aspects:
- Petals: The petals give the rose its iconic shape and are arranged in layers.
- Sepals: These are the small, green leaf-like structures located at the base of the petals.
- Stem: The stem supports the rose and connects it to the plant.
- Leaves: Roses have distinct leaf shapes with serrated edges.
- Thorns: Many rose varieties have thorns along the stem for protection.
Observation:
Before you start a simple rose drawing, take some time to observe real roses. Look closely at their shapes, proportions, and details. Notice how the light falls on the petals, creating shadows and highlights. Observation will help you capture the essence of a rose and make your drawing more realistic.
Preparation:
To ensure a smooth drawing process, follow these preparatory steps:
- Choose the right paper: Select a paper that suits your preferred drawing medium and is of appropriate thickness.
- Set up your workspace: Find a well-lit and comfortable area to work in, with a flat surface to support your drawing.
- Prepare your reference materials: If you’re using images, print or gather them for easy access during the drawing process.

Step-by-Step Guide: A Simple Rose Drawing:
Get ready to embark on a thrilling artistic journey as we immerse ourselves in the exhilarating and fulfilling step-by-step process of giving birth to a simple rose on the canvas of paper. It’s time to let your creativity soar, for this adventure holds the promise of excitement and gratification. With every stroke of the pencil, we’ll breathe life into the rose, capturing its essence and charm. Get ready to fasten your seatbelt and prepare yourself for an incredibly fulfilling adventure that will not only fill you with a deep sense of achievement but also gift you with a cherished masterpiece to hold dear. With excitement building and anticipation in the air, this journey promises to be nothing short of remarkable. So, gear up and embrace the incredible rewards that await as you pour your heart and soul into creating a rose drawing that will stand as a testament to your creativity and dedication. Get ready to savor the sweet taste of accomplishment and the joy of owning a masterpiece that is uniquely yours to cherish. Let’s dive into the enchanting world of rose drawing together! Get ready to unleash your artistic prowess as we unravel each stage and guide you through the intricacies of creating a stunning and captivating rose drawing. Are you ready? Let’s dive in!
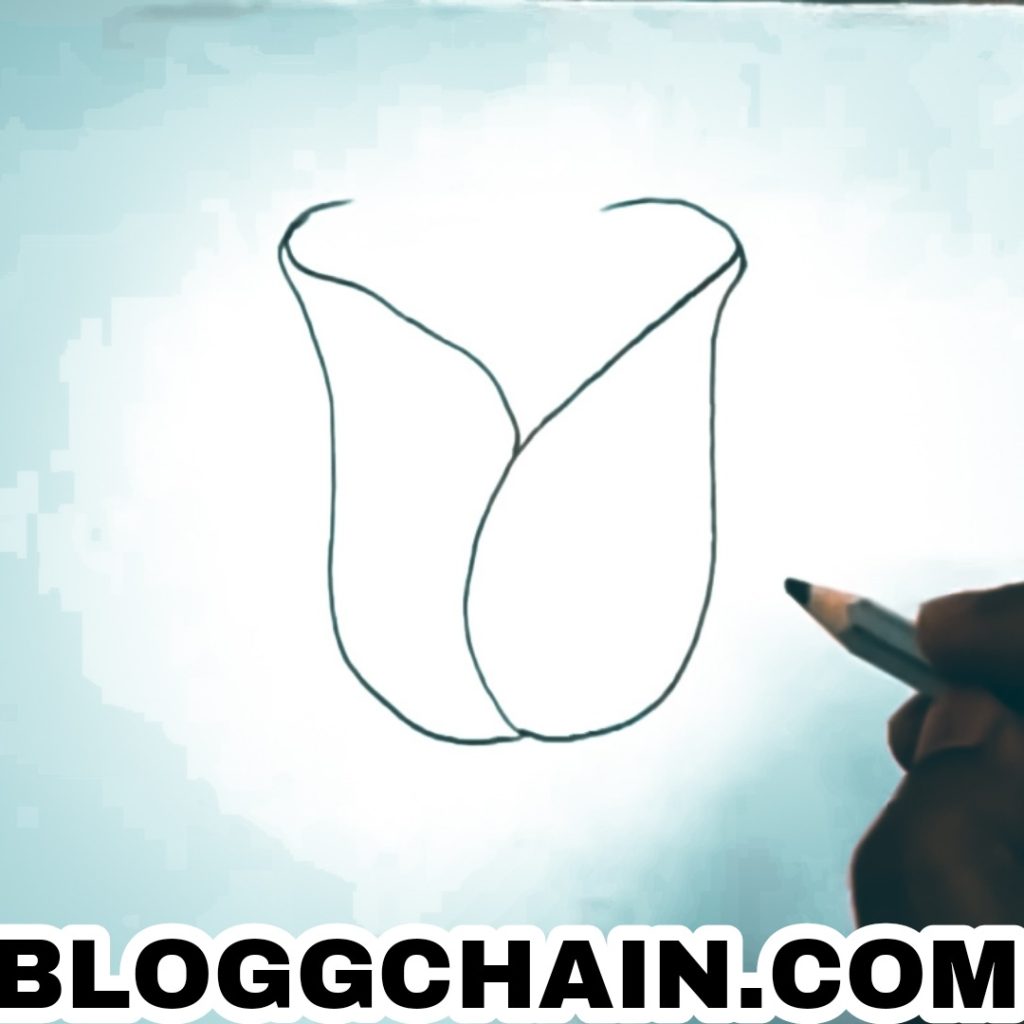
Step 1: Try Sketching the basic shape and outline of the rose
Begin by lightly sketching the basic shape of the rose. Start with a small circle as the center of the flower and draw a rough oval around it to define the outer shape. These initial guidelines will serve as the foundation for the rest of your drawing.
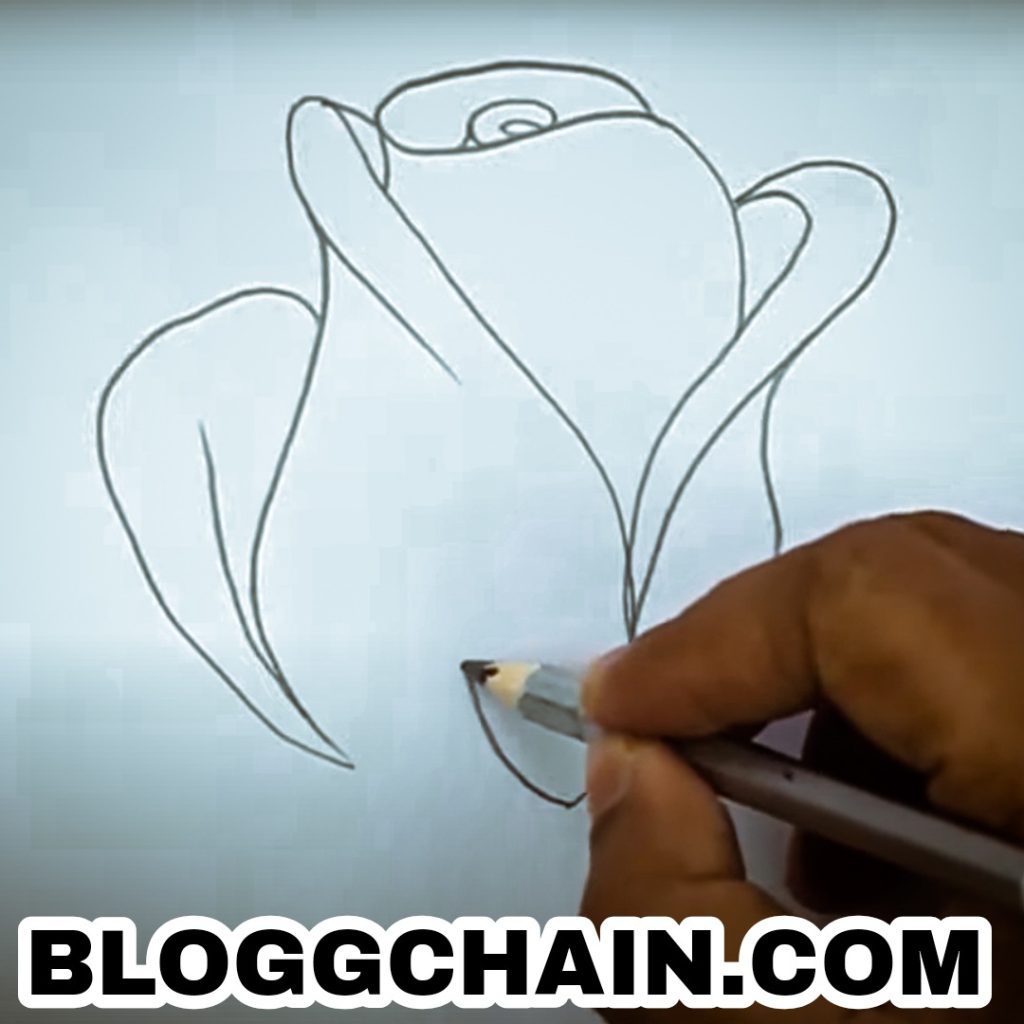
Step 2: Adding petals: How to draw them realistically and symmetrically
Once you have the basic shape, add petals around the circular center. Start with a few petals and gradually add more, maintaining a balanced and symmetrical composition. Pay attention to the overlapping layers and varying sizes of the petals to create depth and realism.

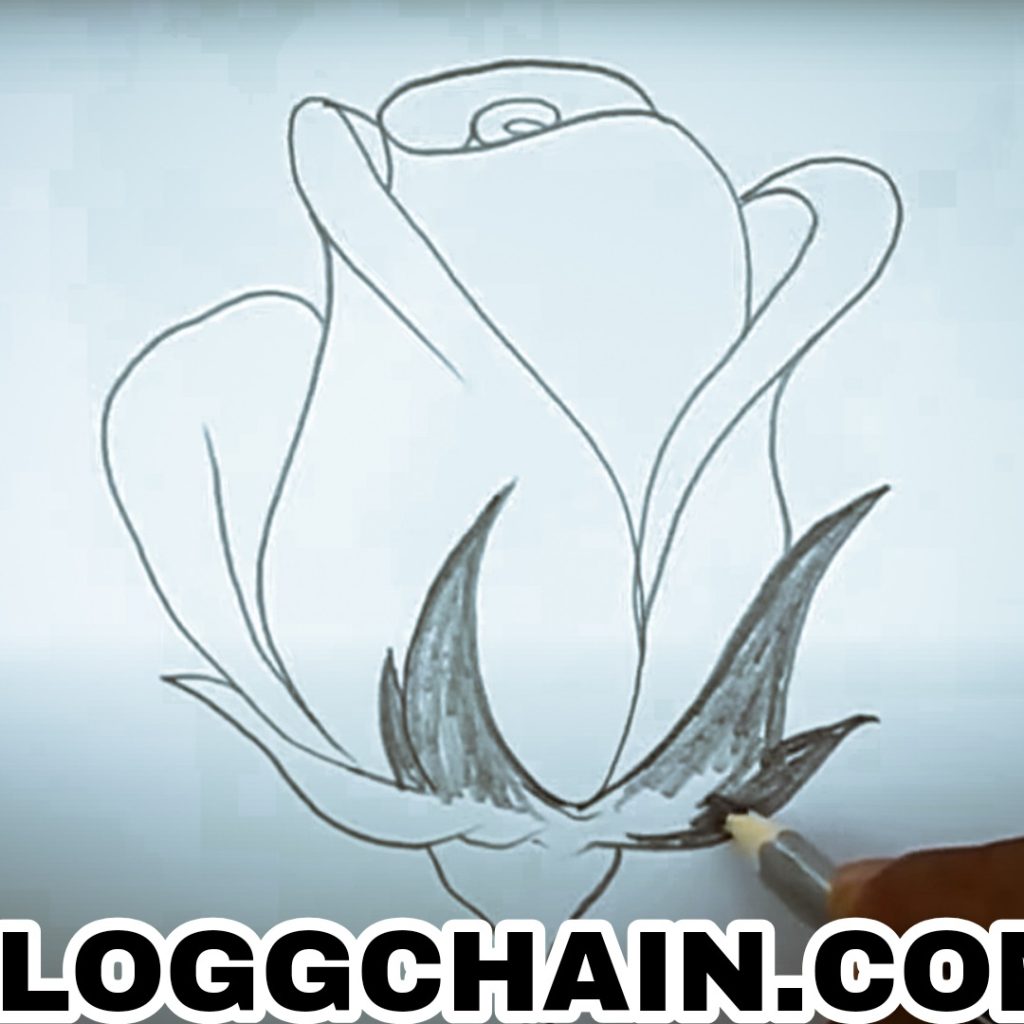
Step 3: Creating depth and dimension: How to shade and highlight
To give your rose drawing depth and dimension, incorporate shading and highlighting. Observe the light source in your reference material and imagine how it falls on the rose. Use a range of graphite pencils to create varying degrees of darkness and lightness. Build up layers of shading to add depth to the petals and create realistic shadows.
Step 4: Adding details: Drawing the stem, leaves, and thorns
Once you’ve completed the flower portion, move on to drawing the stem, leaves, and thorns. Pay attention to the proportions and shapes of the leaves, and add texture and details to make them more realistic. Include the thorns along the stem, positioning them at regular intervals.
Step 5: Tips for perfecting the details
To perfect the details of your rose drawing, keep the following tips in mind:
- Use a sharp pencil for precise lines and fine details.
- Blend and smudge shading using a tortillon or a soft cloth to create smooth transitions.
- Pay attention to the direction of the petals and the curve of the stem to enhance realism.
- Take breaks and step back periodically to assess your drawing from a distance and make adjustments as needed.

Common Mistakes and How you can avoid them in different ways
While drawing a simple rose, you may encounter common pitfalls. Here are some mistakes to watch out for and how to overcome them:
- Overly complex details: Remember to keep your rose drawing simple and avoid adding unnecessary complexities. Focus on capturing the essence of the rose rather than replicating every minute detail.
- Inaccurate proportions: Pay close attention to the proportions of the petals, stem, and leaves. Use light guidelines and regularly compare your drawing to your reference material to maintain accurate proportions.
Practice Exercises:
Improving your drawing skills requires practice. Here are some exercises to help you refine your rose drawing abilities:
- Practice sketching different rose poses and angles: Experiment with drawing roses from different perspectives to expand your understanding of their form.
- Experiment with different shading techniques: Try cross-hatching, stippling, or blending techniques to create various textures and shading effects.
- Style Considerations: As you progress in your rose drawing journey, you may want to adapt your style to match the mood and message of your artwork. Consider the following style considerations:
- Artistic style: Explore different art styles, such as realistic, impressionistic, or minimalist, to find the one that resonates with you and complements your rose drawing.
- Design tips for incorporating your rose drawing into other projects: Use your rose drawing as inspiration for other creative endeavors, such as greeting cards, paintings, or digital illustrations.
Gift:
Claim our premium worksheet practice book For Free (Only for you) :
Advanced Techniques:
Once you feel confident with the basics, you can explore advanced techniques to take your rose drawings to the next level. Consider the following:
Creating realistic textures:
Experiment with hatching and crosshatching techniques to add texture to your rose drawing. These techniques involve using parallel or crisscrossing lines to create shading and texture effects.
Adding color:
If you’re comfortable with colored mediums, such as watercolor, acrylic, or colored pencils, consider adding color to your rose drawing. Unleash your inner artist and embark on a vibrant expedition of color exploration! Delve into a realm where possibilities abound as you discover a myriad of color palettes and techniques to elevate the visual impact of your artwork. From bold and vibrant hues that ignite the senses to subtle and harmonious shades that evoke tranquility, the world of colors is your canvas. So, embrace your adventurous spirit and let your imagination soar as you breathe life into your rose drawing with an exquisite array of colors and techniques.
Troubleshooting: How to Fix Mistakes
Embrace the beauty of imperfection, for within the realm of artistic exploration, mistakes become stepping stones toward growth and improvement. Allow yourself the grace to acknowledge that making mistakes is an inherent and essential aspect of the learning process. Each stroke of the pencil and every line drawn is an opportunity to learn, refine, and expand your artistic horizons. So, fear not the missteps, but rather, embrace them as invaluable lessons that shape your artistic journey and pave the way for boundless creativity. Here are some techniques for erasing and correcting errors in your rose drawing:
- Erasing techniques: Use a kneaded eraser to gently lift off graphite or a precision eraser for more precise erasing. Be careful not to damage the paper while erasing.
- Corrections: Don’t sweat it if you encounter a mistake that’s a bit stubborn to erase. We’ve got your back! One nifty trick is to turn that little hiccup into a creative opportunity by incorporating it into your drawing. Alternatively, you can work some magic with shading and add extra details to cleverly conceal or downplay the error. Remember, art is all about adaptability and making the most out of unexpected surprises. So, embrace the unexpected, get those creative gears turning, and transform those Oops moments into awe-inspiring elements of your masterpiece.
- Inspiration: Famous Rose Drawings and Artists
- Looking at the work of famous artists can provide inspiration and insight into the world of rose drawings. Explore the following:
- A brief history of rose drawings in art: Learn about the significance of roses in art throughout history, from ancient civilizations to modern times.
- Examples of famous rose drawings and their artists: Discover renowned artists known for their exceptional rose drawings and explore their unique styles and techniques.
- Sharing and Displaying Your Artwork
- Once you’ve completed your rose drawing, you may want to share and display it. Consider the following:
- How to showcase your rose drawing in a frame or on social media: Select an appropriate frame to display your artwork, or share it on social media platforms to showcase your talent and receive feedback from others.
- Copyright considerations for sharing your artwork online: If you plan to share your rose drawing online, familiarize yourself with copyright laws and consider adding watermarks or captions to protect your work.
Frequently Asked Questions:
- What if I can’t draw a perfect circle or shape?
- Drawing perfect circles or shapes freehand can be challenging. Don’t worry if your circles or shapes aren’t flawless. Use light guidelines and practice drawing them repeatedly. Over time, your ability to draw accurate shapes will improve.
- What if you are not happy with your final product?
- If you’re not satisfied with your final rose drawing, remember that art is a journey of continuous learning and improvement. Embrace the process and use each drawing as an opportunity to grow. Analyze what you’re not happy with and try again, incorporating the lessons learned from previous attempts.
- Can I sell my simple rose drawing?
- Yes, you can sell your rose drawing if you wish to. Consider exploring online platforms or local art galleries to showcase and sell your artwork. Be sure to understand any legal or copyright implications and price your work accordingly.
- Is there a prerequisite level of drawing skill required to draw a simple rose?
- No, there is no prerequisite level of drawing skill required to draw a simple rose. This tutorial is suitable for beginners and experienced artists alike. With practice, patience, and a willingness to learn, anyone can create a beautiful rose drawing.

Conclusion:
Drawing a simple rose can be a rewarding and enjoyable experience. Ready to unlock the secrets to creating breathtaking rose drawings? Join us on this artistic voyage as you follow our step-by-step guide, implementing the invaluable tips, techniques, and tricks we’ve laid out for you in this article. Prepare to be spellbound by the breathtaking results that await you! With each stroke of the pencil and each skillful maneuver, you’ll witness your rose drawing come to life in ways that will leave you astounded. So, trust the process, embrace your creativity, and be prepared to be amazed at the wondrous outcomes you can achieve through your own artistic prowess. But hey, don’t forget that practice makes perfect. Let’s make practicing a regular habit, shall we? Explore the delightful realm of creativity by experimenting with various styles and techniques, allowing your imagination to run wild. And remember, amidst the artistic journey, the most crucial element is to have an absolute blast! Embrace the joy and passion that accompany your artistic endeavors, infusing each stroke with enthusiasm and a sense of adventure. So, dive in, let loose, and enjoy every single moment of the artistic ride. Let the fun begin! Drawing roses should be a joyful and fulfilling experience, so let your creativity bloom and enjoy the artistic journey every step of the way. So, grab your pencils and paper, and start your artistic journey of drawing simple roses today!
Bonus:
You may check out our most helpful article about how you can help your child to do extremely well in drawing https://bloggchain.com/5-pro-tips-tricks-to-improve-drawing-instantly/
Sponsored By:
Check out the best and most affordable digital marketing services that can take your business to the next level. https://elonmusktrillion.com/


Pingback: Easy Lotus Flower Drawing Tutorials for Beginners in 2023 - Bloggchain