
Sun Drawing, as a captivating and inventive pursuit, not only brings joy and unleashes your creativity but also serves as a remarkable catalyst for amplifying and refining your artistic abilities. The sun, with its universal symbol of warmth and positivity, can be depicted in a variety of ways. Embark on a journey through this comprehensive tutorial, where we will unravel the secrets of crafting a flawless representation of the sun, taking you through seven effortless steps. So, bring your drawing tools, and let’s get started!
Introduction
Delving into the world of drawing unveils an exquisite avenue for self-expression and artistic prowess. Regardless of your level of expertise, whether you possess a wealth of artistic experience or are a novice setting foot on your creative path, mastering the art of drawing a sun promises a gratifying and enriching journey. By following these seven simple steps, you will be able to create a captivating sun drawing that will shine with brilliance on your paper.
The importance of practice for drawing a perfect sun
As with any skill, practice is crucial for improving your sun drawing abilities. As you immerse yourself in diligent practice, a wondrous transformation unfolds, gradually enveloping you in a realm of ease and expertise, empowering you to skillfully encapsulate the distinctive essence of the sun with remarkable precision. Dedicate time to regular practice sessions, experiment with different techniques, and seek inspiration from other artists. With persistence and dedication, you’ll notice significant progress in your sun drawing skills.
Tips for improving your drawing skills
To enhance your overall drawing skills, consider the following tips:
- Study and observe: Take the time to study and observe the sun in real life or through photographs. Pay attention to its shape, colors, and the way light interacts with its surface.
- Draw from life: Practice drawing the sun from direct observation. This will help you develop your observational skills and improve your ability to capture its unique characteristics.
- Explore different techniques: Experiment with various drawing techniques, such as shading, cross-hatching, or stippling. This will broaden your artistic repertoire and help you discover your preferred style.
- Seek feedback: Share your artwork with others and seek constructive feedback. Embrace the inherent value of this process, as it bestows upon your invaluable insights and fresh perspectives, propelling your artistic growth and nurturing the blossoming of your creative prowess.
- Keep a nice sketchbook: Make it an integral part of your artistic routine to carry a trusty sketchbook with you, ensuring its presence becomes second nature. Cultivate the habit of sketching regularly, allowing your artistic instincts to unfold effortlessly, capturing the world around you in strokes of inspiration. This allows you to capture moments of inspiration and practice your drawing skills wherever you go.
Always keep in mind that the path to enhancing your drawing skills lies in the realm of steadfast dedication, continual exploration, and an unwavering ardor for the pursuit of knowledge.
Gift:
Claim our premium worksheet practice book For Free (Only for you) :
The benefits of the mastering sun drawing
Mastering the art of drawing a picture-perfect sun offers several benefits beyond the artistic realm. Here are a few:
- Enhanced observation skills: Drawing the sun requires careful observation of its unique characteristics, such as shape, light, and color. This hones your ability to observe details in other subjects as well.
- Improved motor skills: Drawing involves hand-eye coordination and fine motor skills. Regular practice can improve your dexterity and control over the drawing tools.
- Stress relief: Engaging in artistic activities like sun drawing can provide a calming and therapeutic effect, reducing stress and promoting relaxation.
- Boosted creativity: Exploring different techniques and experimenting with colors and composition can expand your creative thinking and problem-solving skills.
- Self-expression: Drawing allows you to express your thoughts, emotions, and unique artistic vision. Drawing serves as a profound avenue for self-expression, nurturing a profound sense of personal fulfillment. As you master the art of crafting a picture-perfect sun, you embark on a transformative journey that not only hones your artistic skills but also unlocks a treasure trove of cognitive, emotional, and creative advantages.
The Basic Elements of a Sun Drawing
Prior to immersing yourself in the captivating world of drawing, it is essential to grasp the fundamental components that constitute the essence of a sun. The sun is typically represented as a circular shape with rays extending outward. It symbolizes warmth, light, and energy. By incorporating these elements into your drawing, you can effectively capture the essence of the sun and create visually appealing artwork.
Materials Needed for the Sun Drawing
To embark on your sun drawing adventure, you will need a few basic materials. Rest assured, there’s no need to fret as you won’t necessitate any extravagant or pricey materials. Here’s a list of materials you’ll require:
- Paper: Choose a sturdy paper that can withstand the drawing process.
- Pencils: Have a range of pencils, such as HB, 2B, and 4B, for sketching and shading.
- Eraser: A kneaded eraser works best for precise adjustments.
- Sharpener: Keep your pencils sharp for more precise lines.
- Coloring tools: Colored pencils or markers to add vibrant hues to your sun.
Gather these materials, find a comfortable workspace, and let your creativity shine!
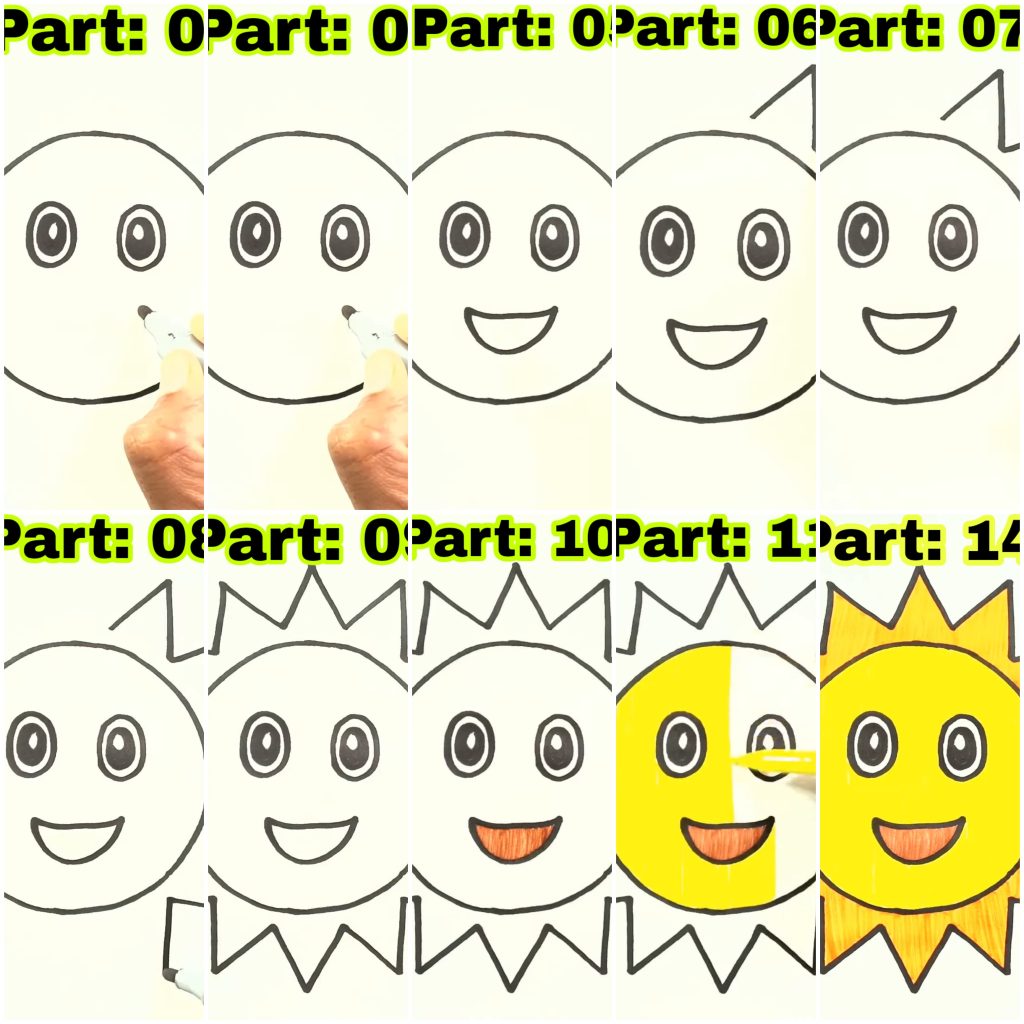
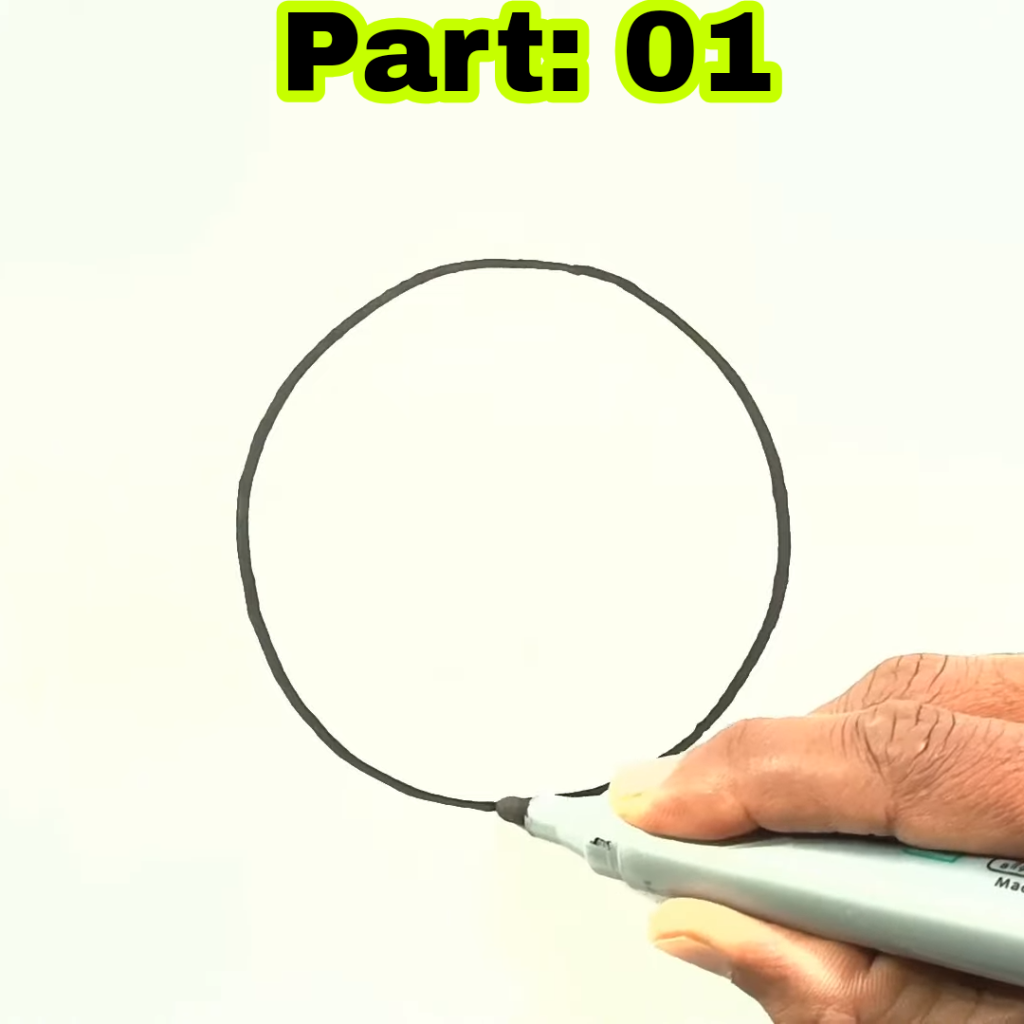
Step 1: Draw a Circle
The first step in drawing a picture-perfect sun is to create a perfectly round circle. The circle will serve as the foundation of your sun drawing. Here’s the process, of how you can draw a circle:
- Position your pencil delicately at the heart of the paper, exerting gentle yet purposeful pressure.
- Rotate your pencil while keeping the pressure consistent to create a smooth circular shape.
- Use light strokes initially to outline the circle, and gradually darken the lines as you refine the shape.
- Crafting a flawless circle through drawing requires a touch of practice, so don’t lose heart if your initial endeavor falls short of perfection.
The importance of drawing a perfect circle
Drawing a perfect circle is crucial because it forms the basis for the sun’s shape. A well-proportioned circle adds symmetry and balance to your drawing, making it visually appealing.
Tips for drawing a perfect circle
Here are some helpful tips to help you in drawing a picture-perfect circle:
- Use a compass if you have available. It provides a precise way to draw a circle.
- Rest your hand on a stable surface to minimize shakiness while drawing the circle.
- Take your time and draw lightly. It’s easier to adjust and refine a lightly drawn circle than a heavily drawn one.
- Practice drawing circles on a separate piece of paper to improve your technique.
Different techniques to draw a circle
If you find it challenging to draw a circle freehand, there are alternative techniques you can explore:
- Tracing a circular object: Place a circular object, such as a jar lid or a coin, on the paper and trace around it.
- Using a circular template: Print or draw a circle of the desired size and trace it onto your paper.
- Drawing with a compass: If you have a compass, adjust it to the desired radius and carefully draw the circle.
Choose the technique that suits you best and practice until you can confidently draw a well-rounded circle.
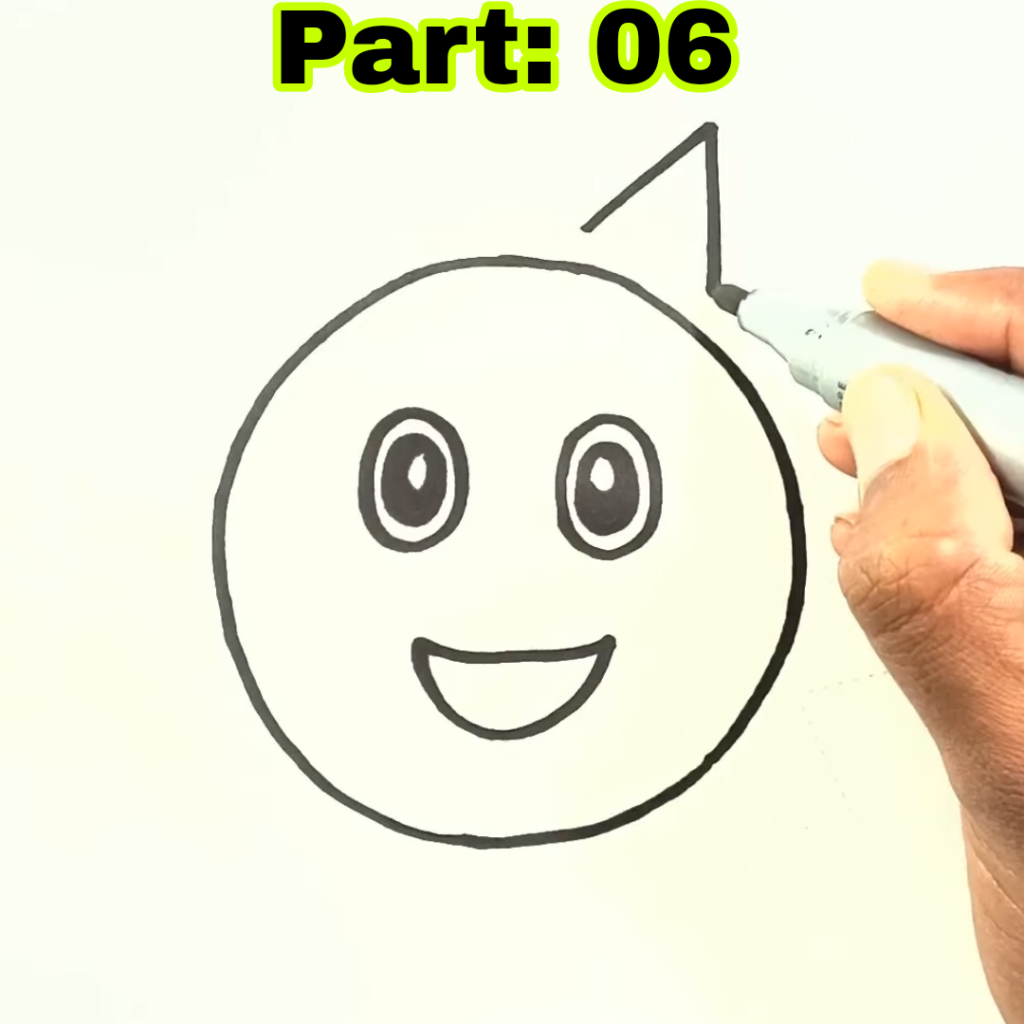
Step 2: Draw the Sun Rays
With the accomplishment of a faultless circle, the moment has arrived to infuse your artwork with the radiance of the sun’s resplendent rays. Sun rays radiating from the center of the circle are a characteristic feature of sun drawings. Follow these steps to draw the sun rays:
- Visualize the center of your circle. This will serve as the starting point for the rays.
- Draw straight lines extending outward from the center of the circle. These lines will act as the framework for the sun’s rays.
- Space the rays evenly around the circle. Consider dividing the circle into equal parts to maintain symmetry.
Understanding how sun rays work
Sun rays, akin to luminous tendrils, gracefully emanate from the celestial orb, bestowing their radiant glow upon the world. In a drawing, they can be depicted as simple straight lines or more elaborate shapes. Sun rays add depth and dimension to your sun drawing, making it visually engaging.
The different types of sun rays
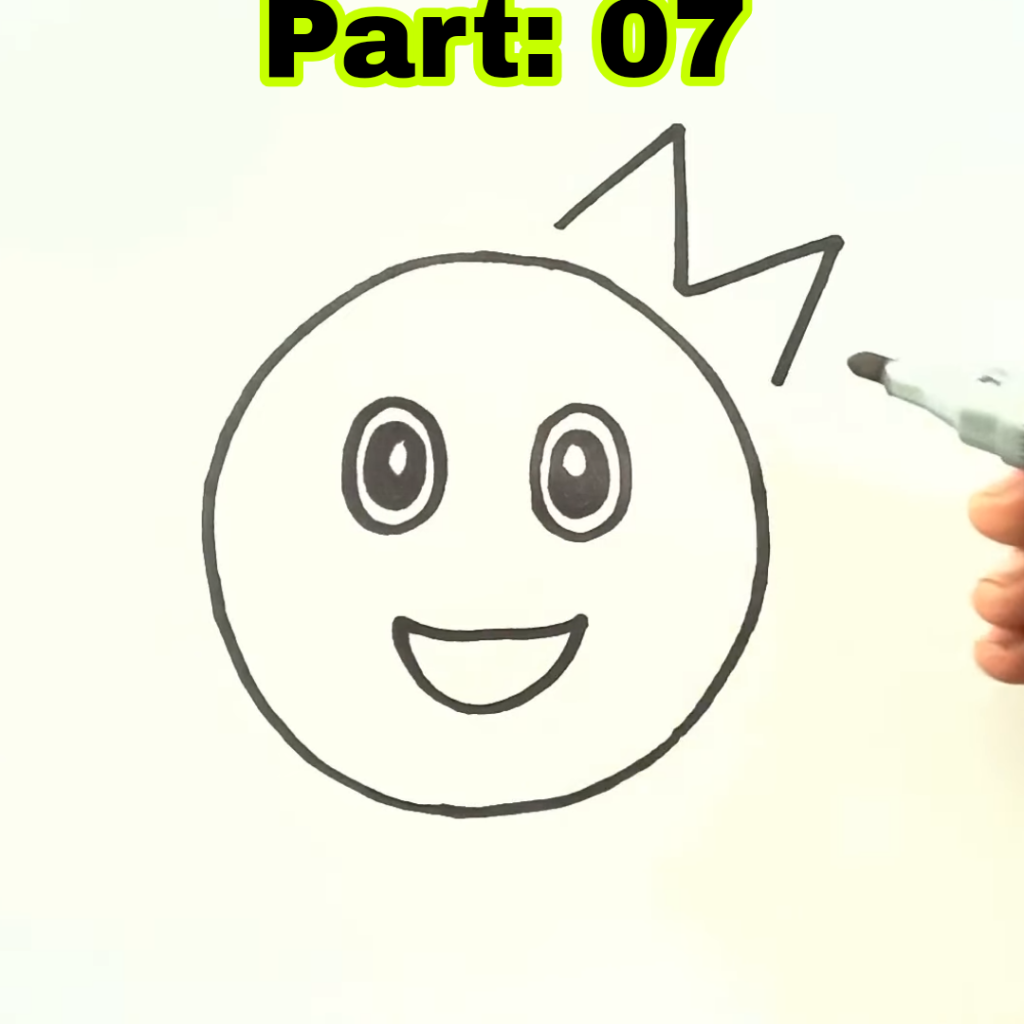
Sun rays can take various forms, depending on the artistic style you wish to pursue. Here are a few common types of sun rays:
- Straight rays: Simple straight lines extending outward from the center of the circle.
- Wavy rays: Curved lines that give a sense of motion and dynamism to the sun drawing.
- Zigzag rays: Angular lines that create a more playful and energetic appearance.
- Feel free to experiment with different ray styles and choose the one that resonates with your artistic vision.
How to add depth and realism to the sun rays
To make your sun rays appear three-dimensional and realistic, consider shading them. Add a subtle gradient effect, where the rays are darker at the base and gradually lighten towards the tips. This shading technique adds depth and volume to the sun’s rays, making them visually striking.
Step 3: Add Details to Sun Rays
Drawing sun rays is just the beginning. To enhance the visual impact of your sun drawing, it’s important to add additional details to the rays. Here’s how you can do it:
- Add shading to the sun rays. In a gradual and deliberate manner, imbue the regions nearer to the sun’s core with deepened shades, while concurrently bestowing a gentle touch to lighten the areas that recede into the distance. It creates a sense of depth and dimension.
- Experiment with zigzags and curves. Introduce subtle bends and twists in some of the rays to give them a more organic and dynamic appearance.
- Make the sun rays look natural by varying their length and thickness. Avoid creating perfectly uniform rays, as nature often exhibits subtle irregularities.
- Adding these details to your sun rays will transform them from simple lines into visually captivating elements of your drawing.
Tips for creating a dynamic effect
To create a dynamic effect in your sun drawing, consider the following tips:
- Vary the length and angle of the rays. Some rays can be longer and more slanted, while others can be shorter and more upright. This adds a sense of movement and energy to your sun.
- Position the rays at different angles. Instead of having all the rays pointing straight outward, experiment with angles to create a more visually interesting composition.
- Overlap the rays. Allow some rays to intersect or overlap, giving your drawing a sense of depth and complexity.
- By incorporating these techniques, you can infuse your sun drawing with a dynamic and lively atmosphere.
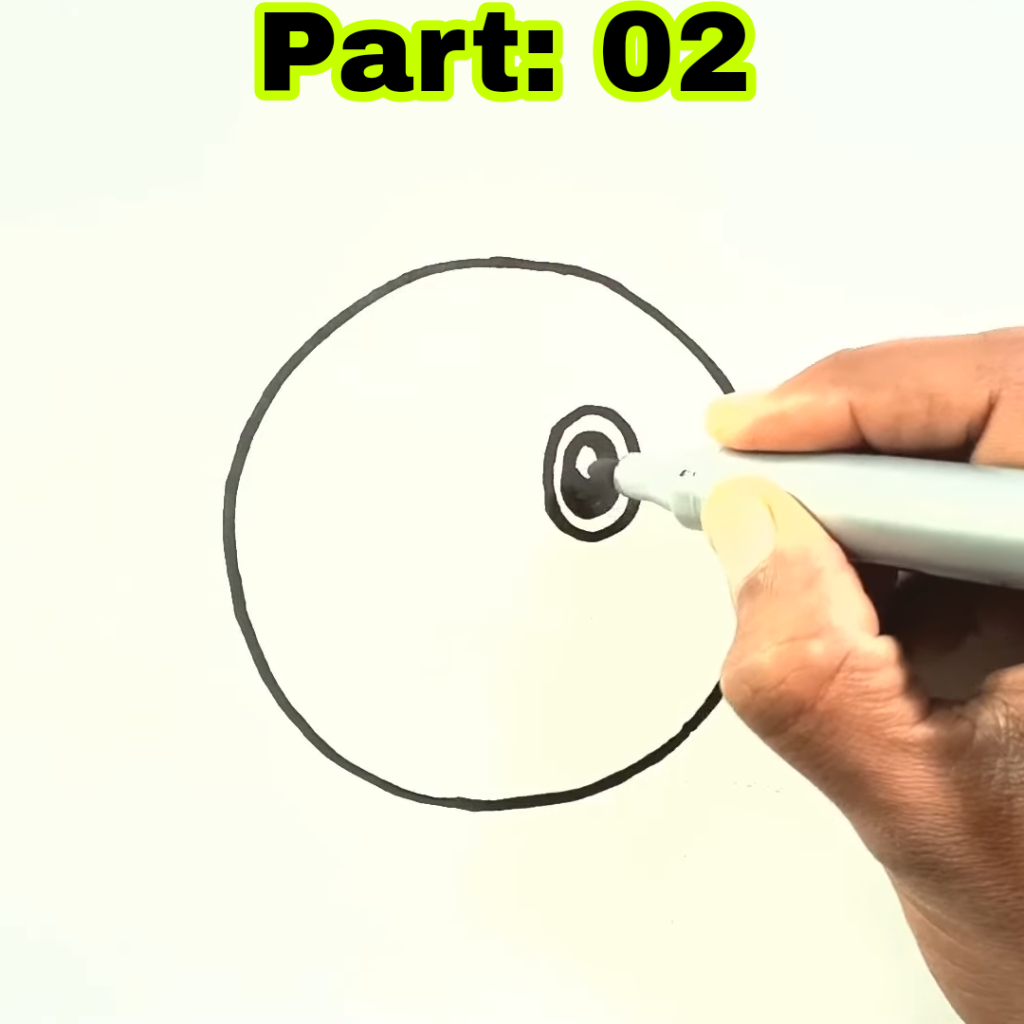
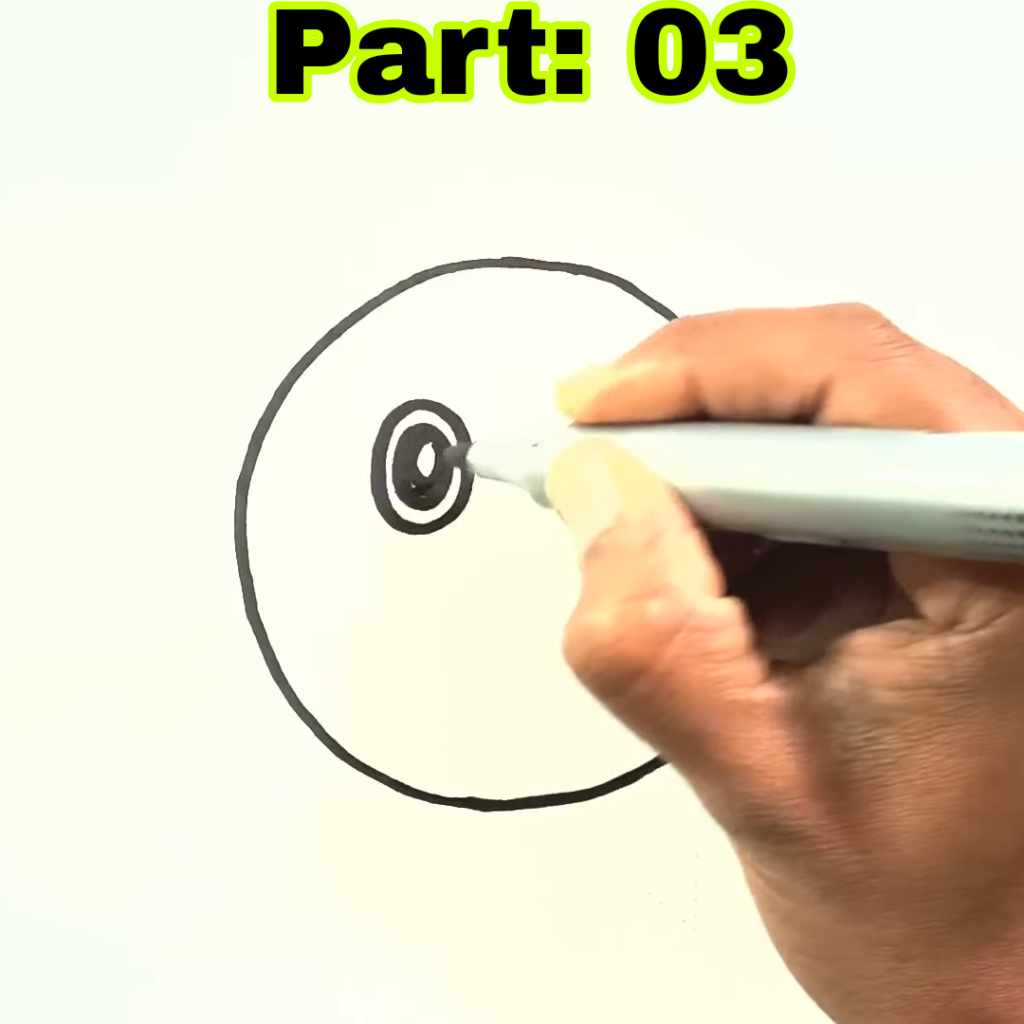
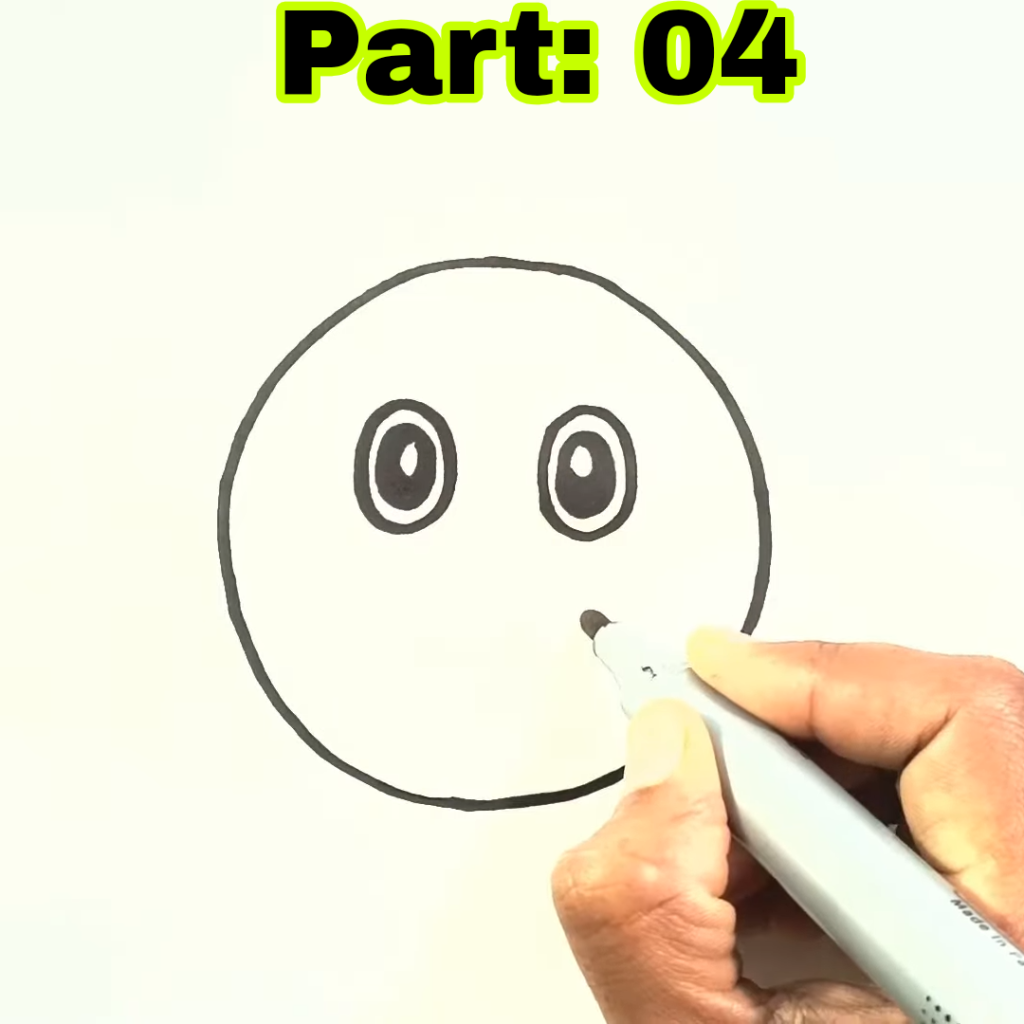
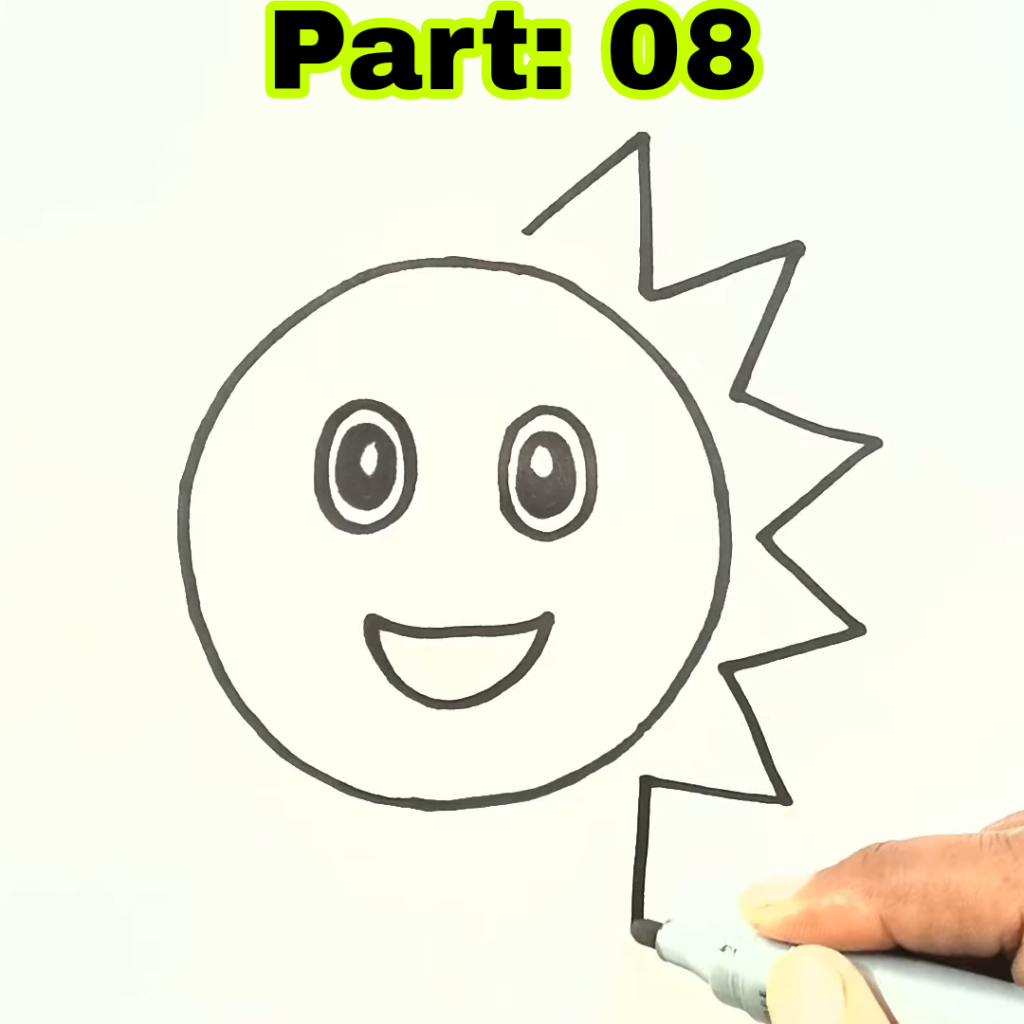
Step 4: Draw the Sun’s Eyes and Mouth
A sun with eyes and a mouth can give your drawing a touch of personality and character. Now, let us embark on a transformative journey, where you shall discover the artistry required to breathe vibrant life into your sun drawing:
- Exercise your creative agency as you deliberate upon the optimal placement and size of the eyes and mouth, imparting character and expression to your sun drawing. You can place them anywhere in the sun, but the most common placement is near the center.
- Sketch the eyes. Draw two circles or ovals for the eyes. Experiment with different sizes and shapes to create different expressions.
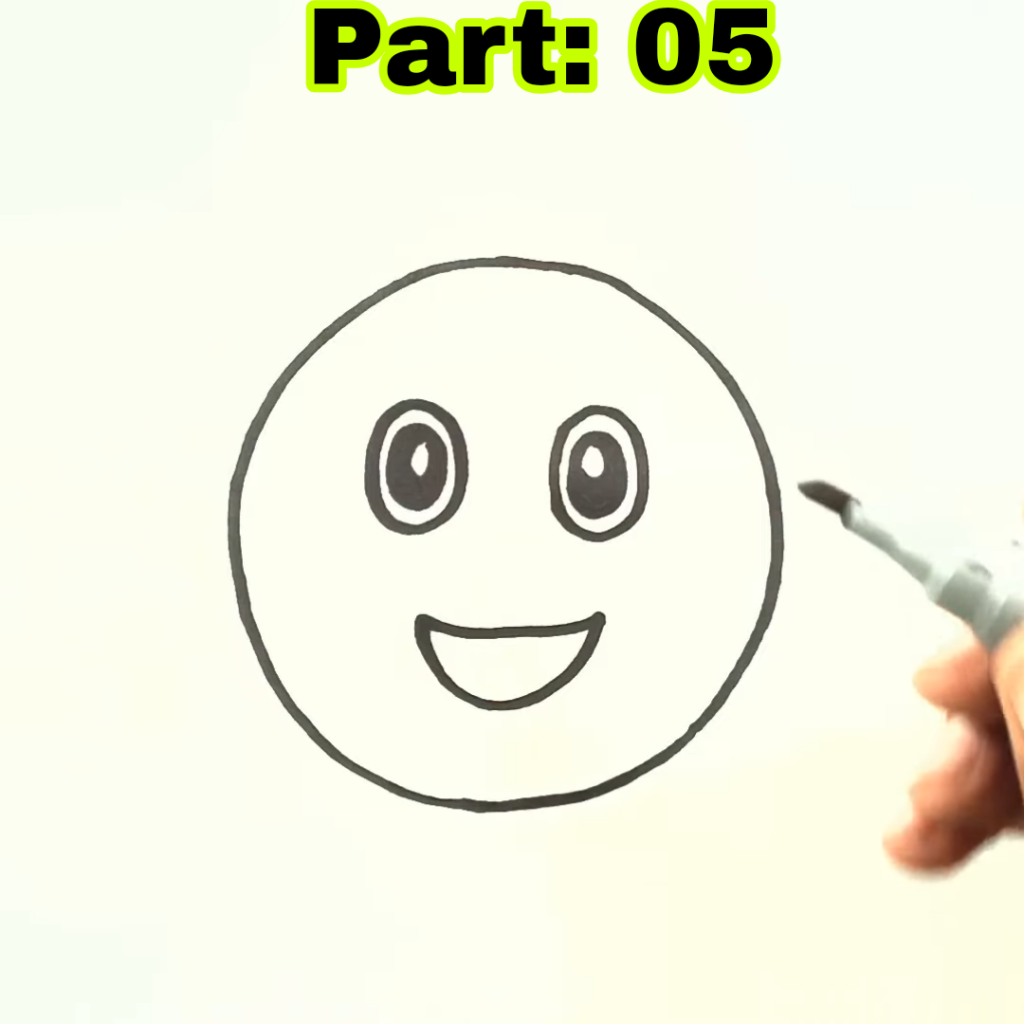
- Add the mouth. Draw a curved line or a gentle arc beneath the eyes to represent the mouth. The shape of the mouth can influence the expression of your sun.
Understand the importance of the eyes and mouth
The eyes and mouth play a crucial role in conveying emotions and expressions. Adding them to your sun drawing allows you to infuse your artwork with a specific mood or feeling.
Tips for creating different expressions
To create different expressions for your sun, consider the following tips:
- Position the eyes closer together for a cheerful or friendly expression.
- Tilt the eyes and mouth upwards to give your sun a happy and optimistic look.
- Experiment with different mouth shapes. A curved, smiling mouth portrays joy, while a straight or downturned mouth can convey a more solemn or contemplative mood.
- Feel free to explore various eye and mouth combinations to find the expression that best represents the mood you want to evoke.
How to add shading and details to the eyes and mouth
To add depth and dimension to the eyes and mouth of your sun, consider shading them. Use light and subtle strokes to darken the areas closer to the edges of the eyes and mouth, while leaving the center slightly lighter. This shading technique creates a sense of volume and realism, making your sun drawing more captivating.
Bonus:
You may check out our most helpful article about how you can help your child to do extremely well in drawing https://bloggchain.com/15-newest-techniques-to-improving-your-car-drawing/
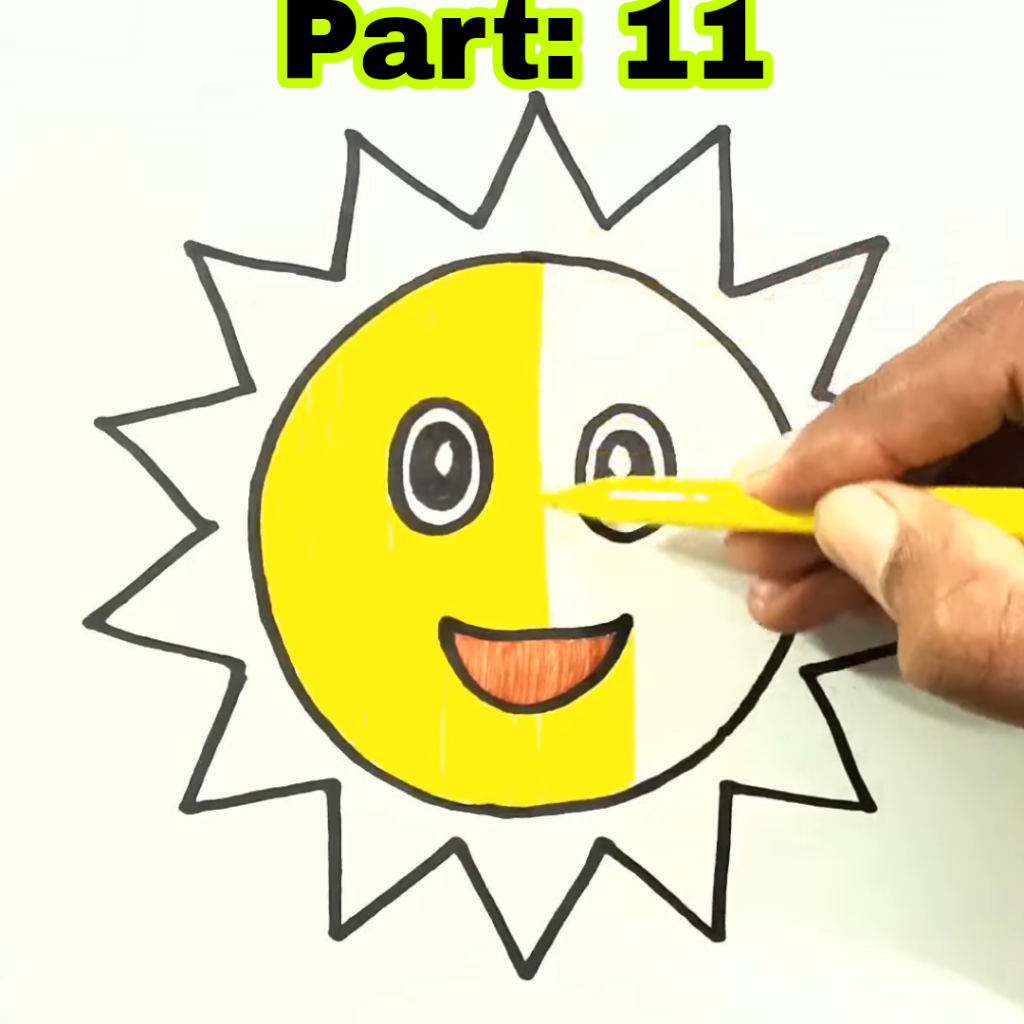
Step 5: Add Color to the Sun
Now that you have completed the outline and details of your sun drawing, it’s time to add color and bring it to life. Here’s how you can do it:
- Choose warm and vibrant colors for your sun. Shades of yellow, orange, and gold work well to depict the radiance and warmth associated with the sun.
- Start with a base color. Use a light yellow or orange shade to color the entire sun. Apply the color evenly using gentle strokes.
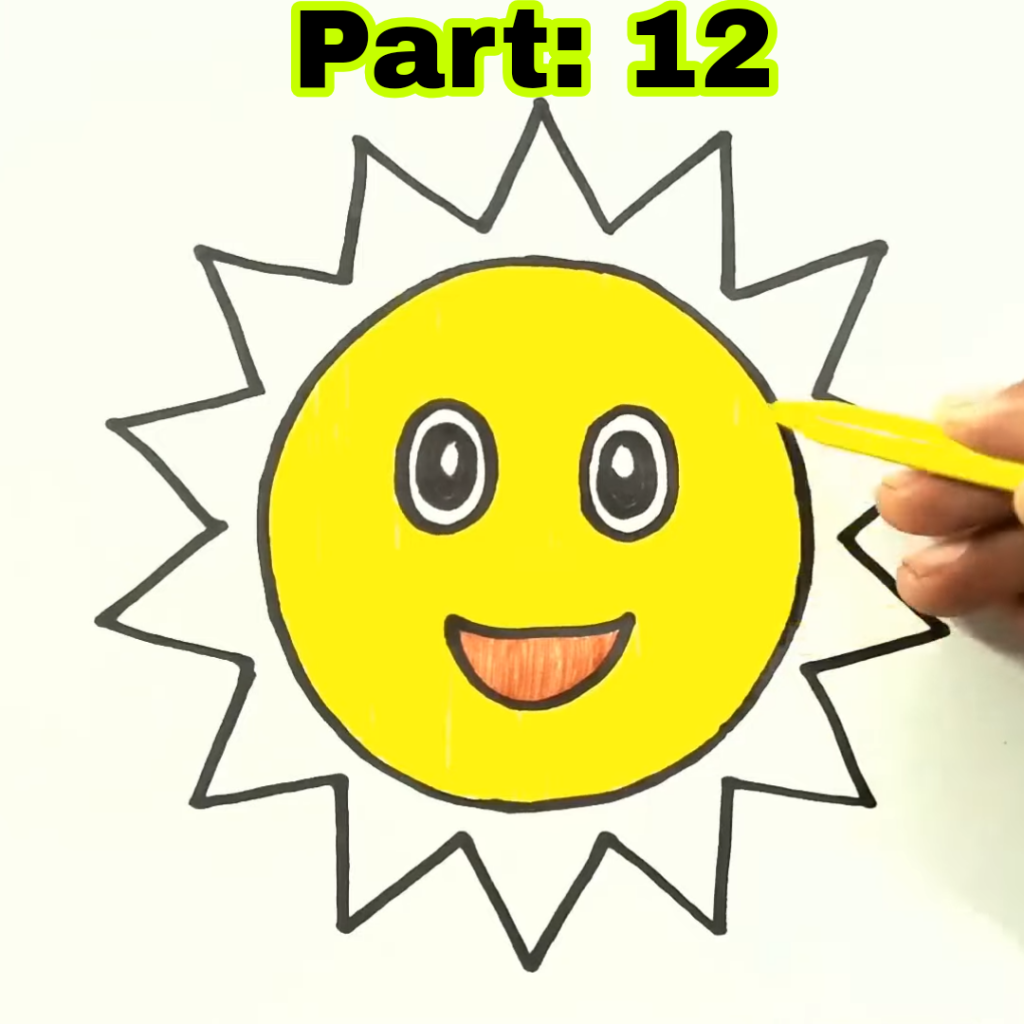
- Add shading and depth. Harness the captivating allure of darker hues in shades of yellow or orange, strategically employing them to infuse areas of the sun drawing with exquisite shading. Focus on accentuating the inner regions of the rays, along with delicately enhancing the spaces surrounding the eyes and mouth, creating depth and dimension in your artwork.
- Blend the colors smoothly. Use blending techniques, such as layering colors or using a blending stump, to create a smooth and seamless transition between different shades.
- Experiment with color combinations. Give yourself the artistic freedom to seamlessly weave in additional colors like red or pink, allowing your creativity to soar as you manifest a distinctive and imaginative interpretation of the sun.
Remember to have fun with the coloring process and let your creativity guide you. There are no strict rules when it comes to choosing colors for your sun drawing.
How to create a warm and vibrant effect
To achieve a warm and vibrant effect in your sun drawing, consider the following tips:
- Use warm color tones. Imbued with a vibrant palette, colors like yellow, orange, and gold conjure forth an innate sense of warmth and vitality, resonating harmoniously with the very essence of the sun.
- Layer colors. Start with a lighter base color and gradually layer darker shades to add depth and richness to your drawing.
- Blend the colors smoothly. Use blending techniques to create a smooth transition between different color tones. It creates a harmonious and visually pleasing effect.
By employing these techniques, you can make your sun drawing radiate with warmth and vibrancy.
The different colors that can be used
While yellow and orange are commonly associated with the sun, don’t limit yourself to these colors. Feel free to explore different color combinations and experiment with shades that resonate with your artistic vision. Here are some additional colors you can consider:
- Red: Adding touches of red can create a fiery and intense look for your sun.
- Pink: Incorporating pink hues can give your sun a softer and more whimsical appearance.
- Gold: Infusing gold tones adds a touch of elegance and richness to your sun drawing.
Keep in mind that the selection of colors is a deeply personal artistic decision, devoid of any absolute right or wrong. Embrace the freedom to explore your own creative intuition and forge a path that resonates authentically with your artistic vision.
Tips for mixing colors
When utilizing colored pencils or markers, it might be necessary to engage in the delightful art of color blending, skillfully intertwining hues to attain the precise shades that align with your artistic vision. Here are a few tips for mixing colors effectively:
- Start with light colors: Begin by layering lighter colors as the base and gradually build up the intensity with darker colors.
- Experiment on a separate paper: Test different color combinations on a scrap piece of paper to see how they blend and interact with each other before applying them to your actual drawing.
- Blend with a light hand: Use gentle strokes and minimal pressure to blend colors together, ensuring a smooth and seamless transition between shades.
With practice and experimentation, you’ll become more confident in mixing colors and achieving the desired effects in your sun drawing.
Step 6: Create a Background
Now that your sun is beautifully drawn and colored, it’s time to give it a suitable background. The background will provide context and enhance the overall composition of your drawing. Here’s how you can create a background for your Sun:
Choose a complementary color: Select a color that complements the colors used in your sun drawing. This will create a visually harmonious composition.
Create gradient effect: Embark on your artistic journey by commencing with a deeper hue of your chosen color, gently caressing the upper reaches of the paper, and gradually allowing it to cascade into lighter tones as your strokes grace the lower expanse, creating an enchanting visual gradient. This creates a gradient effect, mimicking the sky’s natural hues.
Consider adding different elements: Unleash the full breadth of your artistic vision by infusing the background with supplementary elements that align with your creative intent. Whether it be wisps of clouds, graceful birds in flight, or a captivating landscape, let your imagination guide you to craft a backdrop that harmonizes flawlessly with your sun drawing.

Tips for creating a gradient effect
To create a smooth gradient effect in your background, consider the following tips:
- Blend colors: Use gentle strokes and blending techniques to create a seamless transition between different shades of the chosen color.
- Layer colors: Start with a darker shade and gradually layer lighter shades as you move downwards, blending them together for a gradual shift in color intensity.
- Practice on a separate paper: Test the gradient effect on a separate piece of paper to familiarize yourself with the technique and ensure the desired result.
Creating a background adds depth and visual interest to your sun drawing, making it stand out even more.
Different options for a sun setting
When choosing a background for your sun drawing, you have various options to consider. Here are a few suggestions:
- A clear blue sky: This creates a classic and vibrant backdrop for your sun.
- A colorful sunset: Experiment with warm hues like oranges, pinks, and purples to depict a stunning sunset scene.
- A serene beach or landscape: Add elements like palm trees, waves, or mountains to create a picturesque setting for your sun.
Remember to choose a background that complements your sun drawing and enhances its overall visual impact.

Step 7: Final Touches
With the main components of your sun drawing gracefully in place, the moment has arrived to imbue it with the captivating allure of final touches and intricate details, elevating your artwork to a realm where it radiates with undeniable brilliance. Here are a few suggestions:
- Add texture: Use cross-hatching or stippling techniques to create texture in specific areas of your drawing, such as the sun’s face or the background.
- Enhance highlights: Use a white pencil or marker to add highlights to certain parts of your drawing, such as the sun’s rays or the eyes and mouth.
- Refine edges: Take a fine-tip eraser and carefully erase any stray marks or smudges to create crisp and clean edges.
These final touches will elevate the overall quality and visual appeal of your sun drawing.
Tips for adding texture and depth
To add texture and depth to your sun drawing, consider the following tips:
- Experiment with different mark-making techniques: Use various strokes, such as hatching, cross-hatching, or stippling, to create different textures and surface effects.
- Layer colors and shades: Gradually build up the colors and shades in specific areas to add depth and dimension.
- Observe and study references: Look at photographs or other artwork featuring suns to gain inspiration and insights into how texture and depth can be effectively incorporated.
By incorporating these techniques, you can add a touch of realism and artistic flair to your sun drawing.
How to finish off your drawing
Finishing off your drawing involves taking a step back, evaluating your work, and making any necessary final adjustments. Here’s how you can complete your sun drawing:
- Evaluate the overall composition: Assess how the different elements of your drawing come together. Ensure that the proportions, balance, and placement of each component are visually pleasing.
- Make final adjustments: Take a critical look at your drawing and make any necessary refinements. This could include adjusting the shading, enhancing details, or correcting any inaccuracies.
- Sign and date your drawing: Once you’re satisfied with the final result, sign your drawing with your preferred signature or initials and date it. This adds a personal touch and marks the completion of your artwork.
Always bear in mind that within the realm of artistry, every artist possesses their own distinct style and interpretation, rendering each creation an exquisite testament to individuality and creative expression. Embrace your individuality and enjoy the process of creating your picture-perfect sun drawing.

Conclusion
Drawing a picture-perfect sun requires attention to detail, practice, and a willingness to experiment. By following the seven easy steps outlined in this article, you can create a stunning sun drawing that captures the essence of the radiant celestial body. Remember the importance of drawing a perfect circle, adding dynamic sun rays, incorporating details, using colors strategically, creating a suitable background, and adding final touches. With practice, your sun drawings will become more refined and expressive.

FAQs
Q: Why do I need to practice drawing circles?
A: Drawing circles is a fundamental skill that forms the basis for many other drawings, including the sun. Practicing drawing circles helps you improve your control, precision, and understanding of shapes, which are essential for creating a realistic and proportionate sun.
Q: Can I use a crayon instead of a pencil?
A: Absolutely! Crayons can be a great alternative to pencils for drawing a sun. They offer vibrant colors and different textures, allowing you to explore unique effects and styles in your artwork.
Q: How long does it take to draw a perfect Sun?
A: The duration required to manifest a flawless sun drawing is contingent upon factors such as your expertise, proficiency, and desired level of intricacy. It spans a spectrum, ranging from mere minutes to indulgent spans of several hours. The crux lies in savoring the journey, relishing each stroke, and refraining from hastening the creative process. Take your time to create a sun drawing that you’re proud of.
Q: Is it hard to draw a sun?
A: Drawing a sun can be challenging, especially if you’re striving for realism and accuracy. However, with practice, patience, and following the steps outlined in this article, you can gradually improve your sun drawing skills and achieve impressive results.
Q: Can you recommend additional resources to improve my drawing skills?
A: Absolutely! Delve into a world of recommended drawing books and online resources, meticulously curated to nurture and amplify your drawing skills. Explore these invaluable reservoirs of knowledge to embark on an enriching artistic voyage.
“Keys to Drawing” by Bert Dodson
“Figure Drawing for All It’s Worth” by Andrew Loomis
Websites like Proko.com and Drawspace.com offer tutorials and lessons to improve your drawing skills.
Remember to explore these resources, practice regularly, and never stop learning and growing as an artist.
Sponsored By:
Check out the best and most affordable digital marketing services that can take your business to the next level. If you want a build a Blogging Business, Please contact them; They Basically provide from-scratch-to-finish services https://elonmusktrillion.com/


Pingback: Exciting Giraffe Drawing in 5 Minutes – A Quick and Easy Guide - Bloggchain